
Before you install
Use the official Universal Modder repository. You do not need a separate download from this guide. The commands below follow the upstream installation instructions checked on October 10, 2026; if your agent has since changed its plugin interface, compare with that source.
Have a working coding agent before adding Universal Modder. Confirm you can open it and complete a basic task in a normal project. This separates an agent account or installation problem from a plugin problem.
The project lists Git, Python 3.10 or newer, and ffmpeg as requirements, with uv recommended. Blender is needed for the specific workflow that renders 3D assets into sprites. You do not need to configure asset generation to read field notes or plan a mod. See requirements and costs for the distinction.
Keep the commands in the right place: Claude Code's slash commands belong inside Claude Code, while the Codex, Gemini and uv commands below run in a terminal. Installing an integration does not mean a game has already been changed.
Claude Code
Run these two commands inside Claude Code, in order:
/plugin marketplace add rehan-remade/universal-modder
/plugin install universal-modder@universal-modder
The first adds the project's marketplace; the second installs its plugin. After installation, start a fresh agent session if the skills have not appeared. Ask it to identify the Universal Modder skills it can access before asking it to edit a game.
If the slash command itself is unrecognized, check Claude Code's installed version and current plugin instructions. Repeatedly copying a command into the operating-system terminal will not make an in-agent slash command work.
Codex
Run the upstream Codex commands in your terminal:
codex plugin marketplace add rehan-remade/universal-modder
codex plugin add universal-modder@universal-modder
Open your intended working folder in Codex and confirm the integration is visible. If codex is not recognized at all, fix the Codex CLI installation or terminal path first. A missing host command happens before Universal Modder has a chance to load.
The repository also includes .agents/skills for agents that discover skills from a clone. That is a different installation route; you do not need to stack every route on top of a working plugin installation.
Gemini CLI and other agents
For Gemini CLI, run:
gemini extensions install https://github.com/rehan-remade/universal-modder
For VS Code / GitHub Copilot, the upstream instructions say to enable chat.plugins.enabled, run Chat: Install Plugin From Source, and enter the repository URL.
For Cursor, use the Cursor Marketplace route described upstream, or work from a clone that includes the project's agent instructions and Cursor configuration. For OpenCode, clone the repository and start opencode inside that folder.
If your agent supports the Agent Skills format and you only want the skills, upstream also provides:
npx skills add https://github.com/rehan-remade/universal-modder
A skills-only installation should not be treated as proof that every external tool or game-specific dependency is installed. Check the pieces you intend to use. The clone route is also available:
git clone https://github.com/rehan-remade/universal-modder
cd universal-modder
Start your chosen agent inside that directory. Read the repository's instructions before allowing it to run a task.
Verify the um command
Universal Modder's Python CLI is separate from the coding agent. Upstream says plugin installations and clones put it on your path. If you need to install it independently, its documented command is:
uv tool install git+https://github.com/rehan-remade/universal-modder
Then use help commands to check availability without changing a game:
um --help
um scan --help
um backup --help
A successful help screen confirms that this terminal can find and run the CLI. It does not prove the agent is configured, that a particular game is supported, or that every asset tool is ready.
If um is missing, reopen the terminal after installation and check the environment where the package was installed. Windows and WSL can have separate Python installations and paths. Use one environment consistently until the basic command works; the troubleshooting guide covers this boundary.
Optional asset generation
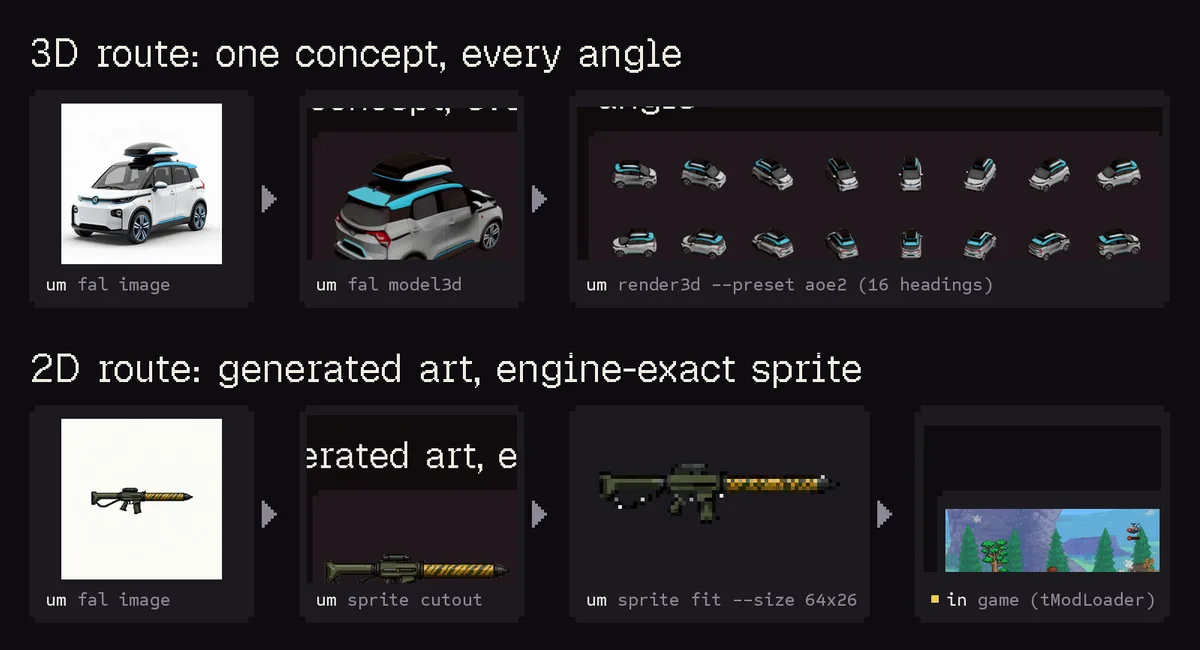
The project illustrates two asset routes: 3D models to directional sprites, and 2D art to a fitted game sprite. View source ↗
Source: Rehan and universal-modder contributors. Game rights belong to their respective owners. Media licenseThe official project supports fal for generated assets. A fal key belongs in your local environment, following the upstream instructions. Do not paste it into this website, a public issue, a screenshot, or a prompt that will be shared.
For images, um comfy can use a local ComfyUI server without a fal key. That path still needs a working local server and its models. It is not an automatic replacement for every kind of asset generation listed in the repository.
Leave asset setup until you need it. A small code-only first mod gives you a cleaner installation test than a task that also requires a generator, Blender and a game loader.
Your installation checkpoint
You are ready for the next step when the agent can find the project's skills, um --help works in your chosen terminal, and you know which game and version you will inspect. A relevant game example or field note should guide the modding route.
Now follow your first small mod. Begin with inspection and a written plan. Do not use a successful installation as a reason to skip backups or approve a broad batch of game-file edits.